
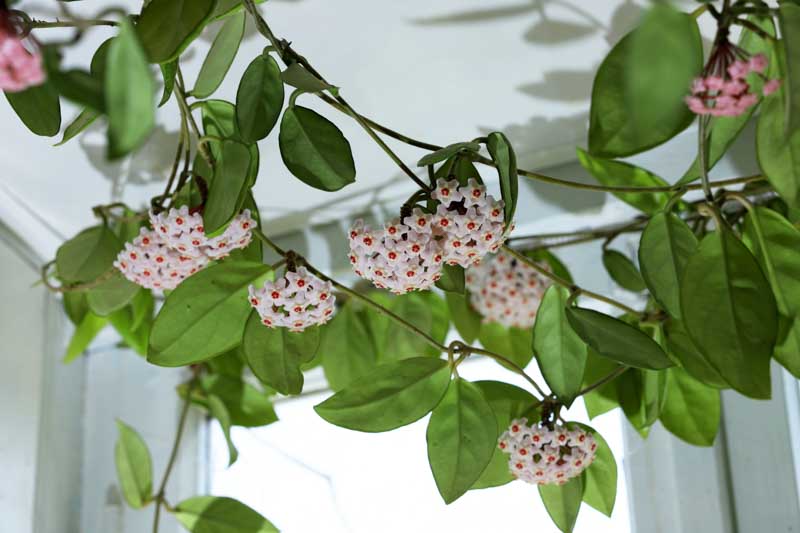
hoya plants – propagate Hoya carnosa, kerrii, and compacta for sale
Hoya plants—commonly known as Wax Plants or Porcelain Flowers—are tropical, vining epiphytes native to Asia and Australia. They are prized as houseplants for their thick, waxy foliage and clusters of fragrant, star-shaped flowers.
Essential Plant Overview
Light: Bright, indirect sunlight. A few hours of gentle morning sun promotes blooming, but intense direct sunlight burns the Low-to-moderate needs. Hoyas store water in their semi-succulent leaves; allow the potting soil to dry out almost completely between waterings.
Soil Mix: Highly well-draining, airy medium. Mix 50% potting mix with perlite and orchid bark to prevent root rot.
Growth Habit: Climbing or trailing. They thrive in hanging baskets or trained up a trellis.
Popular Varieties: Hoya carnosa (classic wax plant), Hoya kerrii (heart-leaf), and Hoya compacta (Hindu rope).
Frequently Asked Questions (FAQs)
Q: How do I get my Hoya to bloom?
A: Provide ample bright, indirect light, avoid over-potting (Hoyas bloom better when slightly root-bound), and never remove the old flower spurs (peduncles), as new blooms develop on the exact same stems every year.
Q: Are Hoya plants toxic to pets?
A: No, Hoyas are non-toxic to cats, dogs, and humans, making them a safe choice for pet owners.
Q: Why are my Hoya leaves turning yellow or soft?
A: Yellow or squishy leaves usually signal overwatering or poor drainage. Let the substrate dry thoroughly and ensure your pot has adequate drainage holes.
Q: How often should I repot a Hoya?
A: Very rarely. Hoyas have delicate root systems and prefer staying in smaller pots for several years at a time. Repot only when roots completely fill the container.
Q: How do I propagate my Hoya?
A: Take a stem cutting with 1–2 leaf nodes, let the cut callouse for a few hours, and root it either in clean water or moist perlite/sphagnum moss. Roots usually appear within 2–4 weeks.
What are the differences between Hoya carnosa, Hoya kerrii, and Hoya compacta?
While Hoya carnosa, Hoya kerrii, and Hoya compacta share similar care needs (bright light, well-draining soil, and low water requirements), they differ significantly in leaf shape, growth structure, and care sensitivity.
FeatureHoya carnosa (Wax Plant)Hoya kerrii (Heart Hoya)Hoya compacta (Hindu Rope)
Leaf AppearanceSmooth, thick, oval/almond-shaped leaves with flecks of silver (“splash”).Distinct heart-shaped, thick succulent leaves.Tightly curled, twisted, rope-like leaves packed closely along stems.
Growth HabitFast-growing trailing or climbing vine.Moderate grower; forms thick vines as it matures.Slow-growing; forms dense, heavy trailing ropes.
FlowersSweetly scented, star-shaped, pale pinkish-white clusters with red centers.Creamy-white to yellow blooms; produces dark brown, sticky nectar.Star-shaped, light pink to white blooms nested among the curled leaves.
Pest VulnerabilityStandard houseplant pests (mealybugs, scale).Standard houseplant pests.High mealybug risk due to deep crevices in twisted foliage.
Best DisplayMoss poles, trellises, or standard hanging baskets.Desktop pots (as single leaves) or trellis support.Hanging baskets where heavy ropes can dangle freely.
Key Differences to Keep in Mind
Single-Leaf Kerrii Warning: Single heart-leaf cuttings of Hoya kerrii sold around Valentine’s Day will stay alive for years, but will not grow into a full vine unless a piece of the original stem node is attached.
Compacta Inspection: Because Hoya compacta foliage is tightly curled, inspect the undersides and crevices regularly, as pests like mealybugs easily hide inside the leaf folds.
How do you propagate Hoya carnosa, kerrii, and compacta, and how do you treat mealybugs on compacta?
All three varieties propagate using the same stem-node technique, but treating mealybugs on a Hoya compacta requires a specific strategy due to its tightly twisted foliage.
Cut Below a Node
Crucial for all 3 varieties
Use sterile shears to take a 4–6 inch cutting. Ensure it has at least 1–2 nodes (the bumpy joint where leaves attach to the stem). For Hoya kerrii, a piece of the stem node is mandatory; a single leaf without node tissue will not produce new vines.
2
Remove Lower Leaves & Callous
Snip off the bottom pair of leaves to expose the node. Let the fresh cut sit exposed for 2–4 hours so the sap callouses over to prevent stem rot.
3
Submerge in Propagation Medium
Place the exposed node into water, damp sphagnum moss, or coarse perlite. Keep the container in bright, indirect light and top off water or moisture as needed.
Pot After Rooting
Once roots grow to 1–2 inches long (typically 3–6 weeks), plant the cutting into a light, well-draining chunky potting mix.
Treating Mealybugs on Hoya Compacta (Hindu Rope)
Because Hoya compacta leaves curl into tight crevices, standard spraying often misses pests hiding inside.
Isolate the Plant: Move it away from other houseplants immediately to prevent the infestation from spreading.
Alcohol Spot Treatment: Dip a Q-tip or small soft paintbrush in 70% isopropyl alcohol and push it into the leaf folds to dissolve the white waxy coating and contact-kill individual mealybugs.
Warm Spray Drench: Mix 1 quart of warm water with 1 tsp of mild liquid soap (or insecticidal soap) and 1 tsp of neem oil. Using a continuous spray bottle or shower head, thoroughly wash and drench the ropes, forcing the mixture deep into the foliage curls.
Apply Systemic Insecticide (If Needed): For persistent infestations, mix systemic granules into the soil. The roots absorb the treatment, killing pests when they feed on the plant’s sap.
Repeat Weekly: Re-treat every 7 days for at least 3–4 weeks to destroy newly hatched nymphs
Can you give me a step-by-step guide to propagating Hoya cuttings in water and soil?
Propagating Hoya cuttings in water or soil is simple as long as you include a stem node and let the cut callouse. Here is the step-by-step guide for both methods.
Step 1: Prep Your Cuttings (Both Methods)
Select a healthy stem: Choose a firm, healthy vine with active growth.
Cut below the node: Using clean shears, make a cut about 0.5 inches below a stem node (the joint where leaves meet the stem). A 4–6 inch cutting with 2–3 nodes works best.
Strip bottom leaves: Remove the lowest 1–2 leaves to expose the node.
Callouse the stem: Let the cutting sit out for 2–4 hours so the fresh cut dries and seals. This prevents rot.
Option A: Water Propagation
Water propagation lets you monitor root development clearly before moving to soil.
Submerge the Node
Place the stem into a small glass jar filled with room-temperature water. Ensure the bare node is submerged, but keep remaining leaves above water.
2
Provide Light & Fresh Water
Set the jar in bright, indirect light. Change the water every 5–7 days to keep oxygen levels high and prevent bacteria growth.
3
Transplant to Soil
Wait 3–6 weeks until secondary root branches form and main roots reach 1.5–2 inches long. Plant into a well-draining, airy potting mix.
Option B: Direct Soil Propagation
Soil propagation creates stronger, air-adapted root systems right from the start.
Prepare the Potting Mix
Fill a small 3–4 inch pot (with drainage holes) with a light, airy substrate like 50% potting mix and 50% perlite or orchid bark.
2
Plant the Stem
Dip the exposed node in rooting hormone powder (optional, but speeds up root growth). Poke a hole in the damp mix and insert the node firmly into the soil.
3
Maintain High Humidity
Water lightly so the soil is barely damp. Cover the pot loosely with a clear plastic bag or humidity dome to trap moisture, opening it every few days for fresh air.
4
Check Root Growth
Place in bright, indirect light. After 4–6 weeks, give the stem a very gentle tug; resistance means a healthy root system has established.
What is the best soil mix recipe for adult Hoya plants?
The best soil mix for adult Hoyas is a coarse, chunky, and well-draining substrate that mimics their natural epiphytic habitat. Standard potting soil holds too much moisture and suffocates root systems.
Classic Chunky Hoya Mix Recipe
Combine the following components by volume:
2 Parts Orchid Bark (Medium Grade): Provides large air pockets and mimics the tree bark Hoyas naturally cling to.
1 Part Perlite or Pumice: Ensures aeration and rapid water drainage, preventing soil compaction.
1 Part Coco Coir or Peat Moss: Retains just enough moisture and nutrients without remaining soggy.
1/2 Part Horticultural Charcoal (Optional): Sweetens the soil and absorbs excess impurities and odors.
Handful of Worm Castings (Optional): Adds a mild, slow-release organic fertilizer source.
Why This Recipe Works
High Aeration: Hoyas are sensitive to root rot; air pockets allow oxygen to reach the roots even after thorough watering.
Fast Moisture Run-Through: Water drains immediately through drainage holes while the bark absorbs just enough surface moisture to keep roots hydrated.
Light & Loosely Packed: Prevents dense packing, allowing root systems to expand freely in small pots.
Why are my Hoya cuttings rotting or turning yellow during propagation?
Rotting stems or yellowing leaves during propagation almost always stem from excessive moisture, lack of oxygen, or tissue bacteria.
Primary Causes & Solutions
Overwatering or Lack of Air Exchange (Soil Propagation)
Cause: The soil is too dense or waterlogged, suffocating the cut stem and encouraging fungal pathogens.
Fix: Use a chunky propagation mix (50% perlite and 50% peat moss or sphagnum) and make sure the pot has drainage holes. Keep the medium barely damp, not dripping wet.
Bacteria in Stagnant Water (Water Propagation)
Cause: Leaving water unchanged allows oxygen levels to drop and bacteria to multiply rapidly around the stem.
Fix: Replace propagation water every 3 to 5 days with fresh, room-temperature water. Rinse the jar thoroughly if algae or slime appears.
Skipping the Callousing Step
Cause: Placing a fresh, raw cut immediately into damp soil or water invites bacteria directly into the open plant tissue.
Fix: Always let fresh stem cuttings sit out in air for 2 to 4 hours so the cut tip dries into a protective seal (callouse) before submerging.
Inadequate Light
Cause: Low light slows photosynthesis, meaning the cutting cannot process water efficiently, leading to leaf yellowing and tissue decay.
Fix: Move the cutting to a bright location with indirect sunlight. Avoid direct, intense sun, which scorches unrooted cuttings.
Submerged Leaves
Cause: Leaves left submerged under water or buried in damp soil rot quickly, spreading decay down to the main stem node.
Fix: Strip off lower leaves so only the clean stem node is submerged or buried.
How to Save a Rotting Cutting
Pull the cutting out of the medium immediately.
Use clean, alcohol-sterilized shears to snip off all blackened, mushy, or yellowed stem tissue back to healthy green wood.
Let the re-cut stem callous for 3–4 hours.
Restart propagation in fresh water or clean perlite.